As LED technology becomes more accessible and affordable for use in small to mid-sized corporate meetings, one of the first questions I'm generally asked is: "How do I create video for this?" The answer depends on a number of factors, including the size and pixel pitch of the various LED walls, the number of actual displays in use, and knowing how to use a streamlined content creation workflow.
A Visually Engaging Message
The following example describes the method of mapping video from a single playback source to four different types of displays, which are arranged in the same visual plane. One might surmise that an individual playback device (such as a D-VTR or media server) would be required for each display -- but based on the features built into modern LED digitizers, projectors and seamless switchers, this is not the case. Only one playback device is required -- provided that you plan ahead.

The Sum of All Pixels
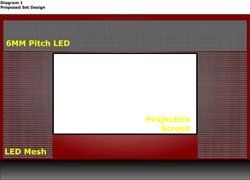
For the content creator (or graphic artist), the first order of business is to sum up all of the pixels for which content needs to be created. In our sample array of displays, the main screen is a 16:9 aspect ratio image at 720p, and the required pixel area is 1280 x 720. The twin LED "mesh" displays are very low resolution, and each requires a pixel area of 250 x 400. For the high resolution (6mm) LED banner, a pixel area of 222 x 1440 is required. The key to the single source playback solution is that all of these individual pixel regions can be managed within a single 1920 x 1080 "palette," for want of a better term.At this point, the content creator needs to build a source mapping "key" - on which he or she can determine how these various puzzles piece fit together within the palette, and without overlapping any regions. Using that key, a "look" can be designed that works together over the four displays, with the goal of creating a complete visual image for the audience. As an additional benefit, the "key" allows the artist to easily gauge the pixel size of each element, how each element fits together spatially, and what the precise synchronization is between the various elements. With separate playback devices, synchronization can be very tricky -- but with the single source playback method and the use of a source mapping key, synchronization is built in.

To create the actual palette and lay out the content, a number of highly versatile 2D and 3D graphics packages are available, and your company's graphic artists should be fully versed in their use.Cookie Cutters on the Palette
Now, once the completed content is transferred to a playout device such as a media server, video can be routed to the required LED processors (or "digitizers"), and also to the projector. The scalers in the LED processors and projector act as "cookie cutters" that enable you to pick out precise sections of the palette, and route those sections to the various target displays.

- By adding a seamless switcher in line, prior to the array of LED processors in the flow of video, you can take full advantage of the switcher's PIP windowing capabilities. In terms of flexibility and creativity, this enables you to overlay additional content on top of the base content, such as I-MAG cameras, live PowerPoint presentations, or even last minute changes to a specific content elements.
- As a final note, in order to maintain superb image quality throughout the entire content creation process, (1) ensure that you know the exact pitch of the LED tiles, and (2), avoid scaling at all costs. If you did your "pixel counting" homework when you created the source mapping key, you won't need to enlarge or reduce the content in order to fit the various screens. As a result, you won't distort the video or lose any information.
