An Essential IP Tutorial for Technology Managers.
Every website, URL, computer, or AV device on the Internet has a number that uniquely identifies it—its IP address. The IP address is the key to routing schemes used on the Internet. Assigning IP addresses to AV devices and controllers is the role of the IT network administrator.
This is usually done in one of two ways: by configuring the device with a specific address or by letting the device automatically learn its address from the network. Dynamic Host Configuration Protocol (DHCP) is used for automatically assigning an IP address. DHCP can save time and administrative effort, and also conserve IP addressing space. Most networks use DHCP to automatically assign an available IP address to a device when it’s connected to the network. On the other hand, devices that aren’t likely to be moved around from location to location, like servers, routers, and switches, may be assigned a fixed address. This is called static addressing. In either case, keeping track of and verifying IP addresses can be critical when makes changes to the control system or troubleshooting problems.
Using Command Line Programs
One method of verifying an IP address is to open a DOS command prompt and use one of these command-line programs. These can help quickly verify the network status and settings of a device. These methods will require a laptop computer and an RJ-45 cable.
Ping
Ping is a test procedure used to verify if a device is active.
A ping test checks to see if the target device is online and accepting active connection.
At the laptop:
- 1. Click on “Start,” and select “Run.”
- 2. Type “cmd” in the box and press enter.
- 3. When the command window and the prompt appears, type “ping” and the IP address of the target device.
- 4. As the ping program displays the results, look for the “Reply from…” response. This indicates that the target device is active.
- 5. Be careful to make certain that if you receive a reply, it is actually the correct device. Confirm that correct IP addresses are assigned to the correct devices.
If the ping program returns the message “Request timed out,” there could be several possible causes:
• The target device is not physically connected to the network.
• The target device is not powered on.
• The target device does not have the correct IP address assigned to it.
Be aware that firewall protection settings on many computers may be highly restrictive, and prevent the ping attempt from getting through.
IP Configuration
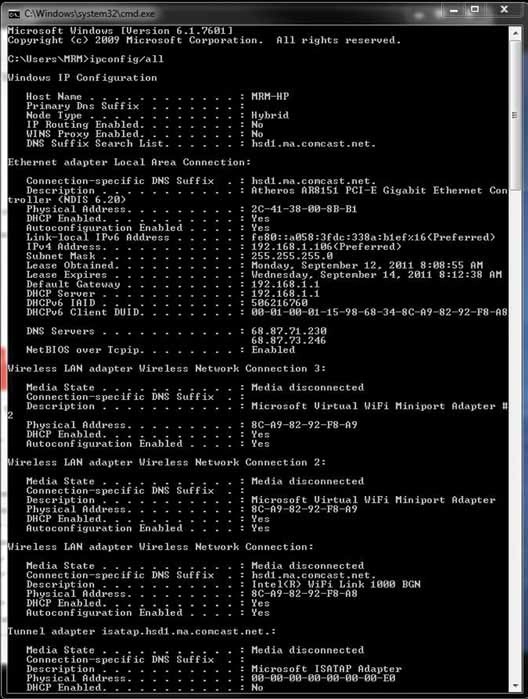
Another command line program is IPCONFIG. This is a Microsoft Windows console application that displays all current TCP/IP network configuration values and refreshes DHCP and Domain Name System (DNS) settings.
1. Click on “Start,” and select “Run.”
2. In the box, type “cmd” and press enter.
3. When the command window appears, at the prompt type, “ipconfig/all.”
4. As the program displays the results, one of the entries will be the IP address and MAC address. To display all available commands using IPCONFIG, type “ipconfig/?”.
Verifying the IP Address of a Control System
To verify the IP address of a control system CPU device, the installer can typically connect to the CPU according to the manufacturer’s recommendations. Another option may be to select a menu option on the front of the CPU that will display the IP address on the LED screen.
If that option is not available, a second method is to connect to the CPU using an RS-232 null modem cable or a USB cable, and use the “HyperTerminal” program. HyperTerminal used to be bundled with Windows XP, but it is no longer available with Windows Vista or Windows 7. HyperTerminal Private Edition is available at www.hilgraeve.com.
1. Connect one end of the RS-232 cable to the PC and the other end to the proper connector on the back of the unit.
2. On the laptop, open HyperTerminal – Start > Programs > Accessories > Communications > HyperTerminal.
3. Create a new connection: name the connection template and select an icon.
4. Select connect > Com1, 38400, n, 8, one, and none. The connection speed may vary. If you are using a USB to serial adapter, you may need to verify which COM port is being utilized for the device. On most PC computers, this can be acquired from control panel/ system/ hardware/ drivers/ COM and LPT ports. The COM port will be listed next to the device.
5. Power on the CPU.
6. Once the boot routine has ended, press the ENTER key at the command line to show the choices available.
After connecting to the CPU, read the owner’s manual to learn how to access the communications or configuration menus to obtain the IP address.
Using an RJ-45 Cable
If the installer knows the IP address of the device, a straight-through RJ-45 cable can be connected to it, and the web-based interface can be accessed. However, some devices may require a crossover cable that can be terminated T568A on one end and T568B on the other end.
Verifying the IP Address of Other Devices
Videoconferencing units typically have a configuration menu that can be navigated to by using a remote control. IP phones also have a menu option for displaying the IP address assigned to the device.
Many videoconferencing codecs use ISDN lines to connect to remote sites. Think of these as unique phone lines. If ISDN lines are used in the system, then you need to verify the SPIDs (Service Profile IDentifiers). Similar to verifying IP addresses, most VTC codecs have a remote control menu-driven interface for locating the SPID and IP numbers already entered in the system. SPID numbers tend to be 14 digits long and usually end in “0101.” Be sure to document any incorrect numbers or addresses.
Most major videoconferencing manufacturers provide a test site, or “loopback site” to call. These test sites may be located in the address book of the codec, or on the company’s website. The test site has continually looping content with video and audio. After connecting, confirm that the remote site’s video can be seen and the audio can be heard. If there are problems, confirm that the volume is not muted, and that the display device is set to the input for the VTC.
Source: InfoComm International, “AV Installation Handbook Second Edition: The Best Practices for Quality Audiovisual Systems.”
IPv6
When the 32-bit version of IP addressing (IPv4) was developed in the 1980s, it was unimaginable to think that there would be more that 250 million devices requiring discrete IP addresses. Web access was conceived as a feature of computing devices, not telephones, household appliances, and AV devices – not to mention the millions of mobile devices around the world that didn’t exist back then. Although DHCP IP address assignment helps by re-using and re-assigning IP addresses, the number of static IP addresses available using IPv4 is expected to be exceeded soon, if it hasn’t been already.
Enter IPv6. The 128-bit addressing scheme allows 1015 endpoints, or 340,282,366,920,938,463,46 3,374,607,431,768,211,456 IP addresses. Beside the sheer quantity of available IP addresses, IPv6 is expected to offer:
• More efficient routing
• Reduced management requirement
• Improved methods to change ISP
• Better mobility support
• Multi-homing
• Security
• Scoped address: link-local, site-local and globaladdress space
