Recently, our special teams coach for Bates College football approached me with what seemed to be a simple request. He wanted to replace an old projector on a cart with one permanently mounted in the overhead. A pull-down screen was already in place. A small sound system was required and a PC and laptop input were added to finish off the equipment list. A small equipment rack was installed on a wall to house the equipment.
With no time to research a custom mount and wait for it to get ordered and shipped, it was time to “fab something up.” The ceiling is very tall and of steel pan construction. The combination of the steel pan roof and a couple of steel I-beams didn’t leave many choices for attaching mounts or hangers. The only challenge I could see was that the ceiling angled up from the outside to inside wall leaving no flat, level surface to attach anything to. Still, being a seasoned installer, I would be able to work out the details later.
Electricians were brought in to pipe all the electrical for the rack and speakers, as well as piping for power and data to the projector location. Due to some emergencies caused by Mother Nature, the job fell behind schedule by a few weeks. A key piece of equipment did not show up on time and slowed things again. These were not unusual setbacks, but the worst was yet to come. Somewhere along the line, a smoke detector was added to the space and the 1-inch piping for it was installed on the bottom surface of the I-beam where I was going to install a projector mount. With no time to research a custom mount and wait for it to get ordered and shipped, it was time to “fab something up.”
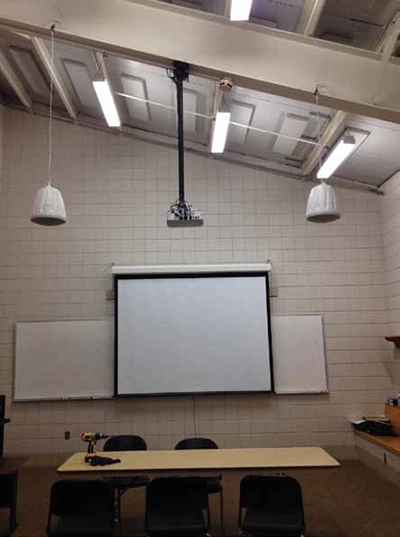
At first, I tried to clamp a uni-strut to the beam, but the spacing was off and I couldn’t get a standard one and a half-inch sprinkler pipe flange to bolt on. From the images, it is apparent the pipe to the fire detection device was not going to allow anything to be mounted flush to the beam surface. By cutting a channel through a 2-x10-inch piece of lumber, I was able to get a flat surface for mounting and allow the pipe to pass through to the detector.
I didn’t have hardware to attach any apparatus to the beam, so drilling was my only option. I consulted our Facilities Maintenance Department and a Structural Engineer to get the okay to drill four 5/16-inch holes in the beam. I cut and painted two pieces of low-profile uni-strut and the wood. The uni-strut was used as a stiffener to add some rigidity to the mount. Quarter-inch bolts, fender washers, and locknuts were used to complete the hardware list and attach my apparatus to the beam.
To some, the last piece may look familiar. Yes. That is the projector side of a Chief RPA ceiling mount. This allowed me to get the angle I needed for the rather lengthy projector pipe. I must say that the pitch and yaw adjustments built into the mount were an added bonus.


Without any hardware to attach the apparatus to the beam, drilling was the only option.
As an installer working on large television production studios and multi-projector warfare briefing rooms, as well as small projects such as the one talked about before, I have come to realize that no amount of preparation can help avoid the unexpected situations like this. Taking a longer look at the overhead and not minimizing the tasks at hand would have possibly helped. I have also found that keeping boxes of parts and leftover hardware from install jobs can pay off. Sometimes these little trinkets of leftover trash become gold when it comes time to “fab something up.”
Gary Russell is an AV engineer for Bates College in Lewiston, ME. He has 30+ years in varied AV related trades including installation, mobile production, and bench repair. An Airbourne Video Specialist U.S. Air Force, he has his CTS and Crestron DMC (T.E.D.) certifications and continuing credits for Mechanical Engineering and Machine Tool Technologies.
