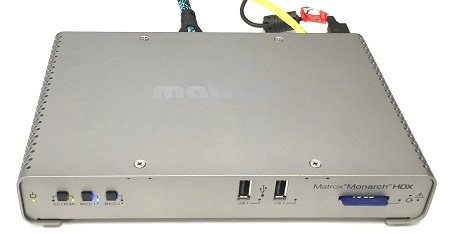

Figure 1. The Matrox Monarch HDX Whenever you shoot video these days, you often have to stream the video live, record a high-quality file for uploading or further production, or do both. If this dual-output requirement sounds familiar, you should consider the Matrox Monarch HDX, a flexible dual-channel H.264 encoder you can run standalone; or integrate into a broadcast or streaming environment with the newly released Monarch HDX Dev Tools and Monarch HDX Control API.
Design and Form Factor
The HDX is about the size of a 300 page paperback novel, so it can fit neatly on a desk or table, or you can fit two side-by-side on a 1RU rack. The unit accepts both HDMI and 3G HD-SDI input, but only one input is live at any time; you can record or stream two files simultaneously, but they must be from the same input, though you can also input a separate audio signal via a 3.5 mm connector. You can preview the audio/video stream via an HDMI output, preview audio only through a headphone jack, with HD-SDI output connector for passthrough.
Though the unit has a small fan, operation is very quiet. You could easily run this encoder in a conference room or classroom without any complaints.
Recording and Streaming
The HDX can record and stream at resolutions ranging from 128x128 to full 1920x1080 at 60/50, 30/25/24 and 15/12.5 frames per second. Operation is flexible; you can stream two outputs to two different services simultaneously, record two streams simultaneously, or record a file and stream a file simultaneously.
Each use has unique limits however. For example, when outputting two live streams, the maximum data rate for each is 10 Mbps; when outputting a single live stream, the maximum data rate is 20 Mbps. If recording two streams, the maximum total data rate is 30 Mbps; if recording a single stream, it’s also 30 Mbps, as is the max when recording one channel and streaming another. The same audio settings are applied to both channels; if you encode at 128 kbps for streaming, you have to use the same parameters for recording.
Configuration and Control
You configure the HDX by logging into its browser-based Command Center from a computer with access to the HDX’s IP address, which can be dynamic or static. Once configured, you should be able to run the unit via buttons on the front panel. This means that you can configure the unit in your office, and give the unit to non-streaming professionals to use in the field. So long as they can plug in all the cables, and press the right buttons, they should be good to go. If they experience any problems, you can log in remotely assuming that on-location firewalls aren’t an issue.
The Command Center interface distributes most controls over four screens accessed by buttons on the lower right, Device, Input Settings, Encoder Settings, and Status. The Device screen contains most high-level configuration options, like IP Setup, and info screens that detail firmware versions and similar information. If you have multiple HDX units installed, you can switch between them in the Device screen, so you can access and control all units from a single interface. As the name suggests, the Input Settings window is where you choose your audio/video inputs.
The Encoder Settings screen is where you’ll choose your most important configuration options. The first option is always the mode, which can be RTMP or RTSP for streaming, Recording (for recording), or None from when that encoder is dormant. Once selected, you can choose between 11 encoding presets ranging from 640x480 to 1080p with the usual stops in between. From there, you can customize the settings shown in Figure 2, but can’t save the encoding configuration as a preset. If you’re an H.264 tweaker, you may be frustrated by the lack of granular H.264 settings, but the most important settings are there.

Figure 2. Setting Encoder 1 to stream to Ustream. Once you’ve configured all settings for Encoder 1 and 2, you can save that off as a Profile, as you can see at the top of Figure 2. Once saved, you can recall the profile to restore the settings necessary for a particular event or location.
On the bottom of Figure 2 are the settings for streaming to an RTMP-based service, which are pretty standard. When recording a file, in addition to the parameters shown in the middle and top of Figure 2, you can opt to save the file in either MOV and MP4 format, name the stored file and choose the output location, which can be a hard drive on one of the two USB slots, an SD card in the SD card slot, or an accessible network location. In the manual, Matrox advises that HDX doesn’t work with all USB drives, particularly those that aren’t separately powered, and I tested on two such drives and neither worked. If you plan to record to a USB drive during an event, check the drive before it’s crunch time.
Each time you change a configuration in the Encoder Settings screen, you’re prompted to click Apply to save and apply the change. When you’re ready to go live, you start streaming or recording by clicking separate buttons in the Control Center for Encoder 1 and Encoder 2. From there, you can click over to the Status screen to view a preview window and check operational status. In the field, LEDs on the unit also advise you of operational status, with blue lights indicating a channel that’s streaming, red indicating a channel that’s recording and the drive it’s recording to, and a yellow light indicating an error in recording or streaming.
Overall, operation is a straightforward, but there are rough edges. For example, when you press Apply to input new settings, HDX checks some settings but not all. For example, if the combined data rate exceeds the maximums described above, the target data field turns red. Then, if you hover a mouse over the red field, an error message will tell you that the data rate is too high.
However, HDX doesn’t check your streaming credentials, or if there is a hard disk or SD card in the specified storage media. In some instances, you won’t know there’s a problem until you try to start recording or streaming and it fails, prompting you to look at the Status screen to figure out what’s going wrong. Matrox should check all parameters that it can when you click Apply to avoid last minute errors.
In addition, once in the Status screen, if you click Preview to view the confidence stream, you won’t be able to see it if you’re running Google Chrome because it uses the QuickTime plugin, which Chrome deprecated earlier in 2015. Another nit is that if you change the settings and forget to click Apply, HDX starts encoding using the old, saved settings. A warning like, “hey dummy, did you mean to click Apply or encode using the old settings?” (in politically correct language, off course) would have been appreciated. I’d be embarrassed even to estimate how many times I had to re-encode a test file because I forgot to click Apply.
Fortunately, these UI-related issues are minor and easily resolved. In all of the most important performance-related measures, HDX excelled.
Performance and Quality
At a high-level, you want your streaming encoder to a) connect to your target websites, b) produce high quality audio and video c) at or near the target data rate with d) a consistent data rate so it streams smoothly, e) without loss of audio/video synch. During my tests, I connected the HDX to four RTMP-based sites, Ustream, YouTube Live, Joicaster, and Onstream, with some tests lasting over an hour without any connection issues or loss of audio/video synch. That takes care of a) and e).
In terms of data rate accuracy, Monarch was generally within about 3-5% of the target. At the most aggressive data rate (720p@1 mbps), the average data rate for the seven-minute test sequence was 1081, about 8% off target. However, the more reasonable 720p@3 mbps file came in at 2903 kbps, a difference of about 3%, while the actual data rate at 1080p@5mbps was 4760 kbps, a miss of about 5%. Of course, missing low is better than missing high because it won’t overwhelm your outbound bandwidth.
In terms of consistency, according to the Bitrate Viewer application, Monarch produced very consistent streams like that shown in Figure 3 for all files I checked except for the 720p@1mbps file, which showed short data rate spikes at the start of each of the two test clips in the longer test. This likely related to the fast fade from black at the front of each clip, which can stress an encoder at lower rates. Unless your footage has lots of fades to and from black, this shouldn’t cause a problem in a real production.
Figure 3. Bitrate Viewer showing a 3 Mbps file flat lined at 3 Mbps Finally, to assess quality, I recorded and streamed at data rates ranging from 1 - 20 mbps @ 720p and 5 mbps @ 1080p using a talking head file and some footage from a single camera bluegrass concert shoot. The results were impressive; even at very aggressive data rates, the HDX resisted blockiness and other obvious artifacts, and produced crisp, clear video without dropping frames.

Price-Point
The HDX is priced at $1,995 retail. In contrast, the Monarch HD, which shipped in 2013 and which Matrox continues to sell, costs $995, but only accepts HDMI and while it can record and stream simultaneously; it can’t record two files, or output two streams simultaneously. Probably the closest product to the HDX is the PESA XSTREAM C22, which inputs HDMI and 3G HD-SDI, but enables both encode and decode so it can serve as a point-to-point video bridge. The C22 retails for $3,995.
The Last Word
Despite a few minor interface rough edges, the HDX performed very well in our tests, is very easy to operate and well featured, and has footprint and noise profile that lets you use it almost anywhere. For developers, Matrox offers automatic configuration tools, an application programming interface (API), with integration with Crestron or ROSS DashBoard systems. This makes the HDX a very solid choice for standalone or integrated encoding operations.Jan Ozer is a streaming media consultant and frequent contributor to AV Technology, Streaming Media, and other industry magazines. He is the author of Video Compression for Flash, Apple Devices and HTML5.
